How to Build a WordPress Website (A to Z – Complete Guide)
All product reviews are based on hands-on testing using our internal review methodology. We work directly with product makers to ensure our content is accurate and helpful to readers. Learn more about our marketing service.
WordPress is the world’s most popular Content Management System (CMS). It’s free and allows installation of other software (i.e., plugins and themes), which helps you to create a website tailored to your specific needs.
Building a WordPress website is not hard, but it’s a time-consuming process. There are several steps involved, and carrying them out can be overwhelming for a newbie. With the right guide, however, making a WordPress site is uncomplicated and painless.
This article aims to inspire confidence and offer the necessary information to help build a basic WordPress website. I recommend that you set aside some time and follow this tutorial to the letter.
Cost of Creating a WordPress Website
Getting started with a WordPress website is more affordable than you might think.
To get a website up and running, you require:
- WordPress
- Theme
- Plugins
- Domain name
- SSL certificate
- Hosting server
These are all mandatory.
WordPress itself is free, and you can find plenty of free themes and plugins to customize your site. However, there are a few expenses you’ll need to consider.
You’ll need to purchase a domain name, which is essentially the address of your website (like ctrlwp.com). This typically costs around $15 per year.
You’ll also need a hosting server to store your website’s files, which can cost between $60-80 per year.
Many hosting providers throw in a free SSL certificate (a digital certificate that verifies your website’s identity) for the first year.
All in all, you can get a basic WordPress website up and running for around $100.
That’s a pretty affordable price tag for a professional-looking website. With WordPress, you can create a website that’s tailored to your needs, and with a little creativity, you can make it look amazing.
Now that we’ve got the costs covered, let’s dive in and start building your WordPress website!
How to Build a WordPress Website (6 Steps)
These are the steps you will need to take to build a WordPress site:
- Step 1: Buy a domain and a hosting server
- Step 2: Install an SSL certificate
- Step 3: Install WordPress
- Step 4: Set up WordPress
- Step 5: Adding themes and plugins
- Step 6: Add content (posts and pages)
Step 1: Buying a Domain & Hosting Server
A domain name is the URL of a website (example: ctrlwp.com). A hosting server refers to hardware that stores your website’s files and folders.
You need to pick a domain name carefully because it’s the first thing people will see and remember about your online presence.
Here are some things to consider when choosing a domain name:
- Keep it short, sweet, and simple (example: google.com, amazon.com)
- Make it memorable and easy to spell (avoid typos and awkward combinations)
- Choose a name that reflects your brand or business (example: petstore.com)
- Consider your target audience and local market (example: .co.uk for UK-based businesses)
- Check the availability of social media handles with the same name
Here are some things to avoid when choosing a domain name:
- Numbers and hyphens, as they can be confusing and hard to remember
- Names that are too long or hard to spell
- Names that are too similar to existing trademarks or brands
- Names with awkward or negative connotations
- Names that are too generic or vague (example: “bestproduct.com”)
I recommend using these domain name generators to find a domain name: Wordoid, Lean Domain Search, and DomainHole.
Remember, your domain name is the face of your online presence, so take your time and choose wisely.
Once you have a domain name ready, choose a great but affordable hosting provider. HostWP, Namecheap, Bluehost, DreamHost, Hostinger, and A2 Hosting are considered beginner-friendly and affordable hosting providers.
To register your domain name, go to the hosting provider of your choice and add the domain name.
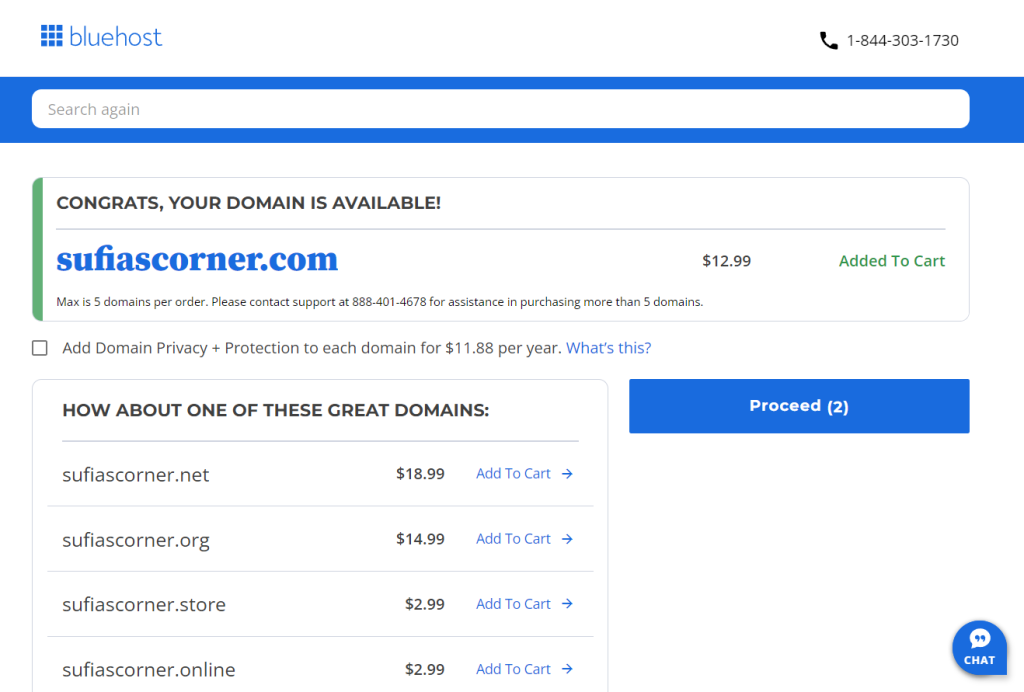
Next, pick a basic shared hosting plan and proceed to register and make the purchase.
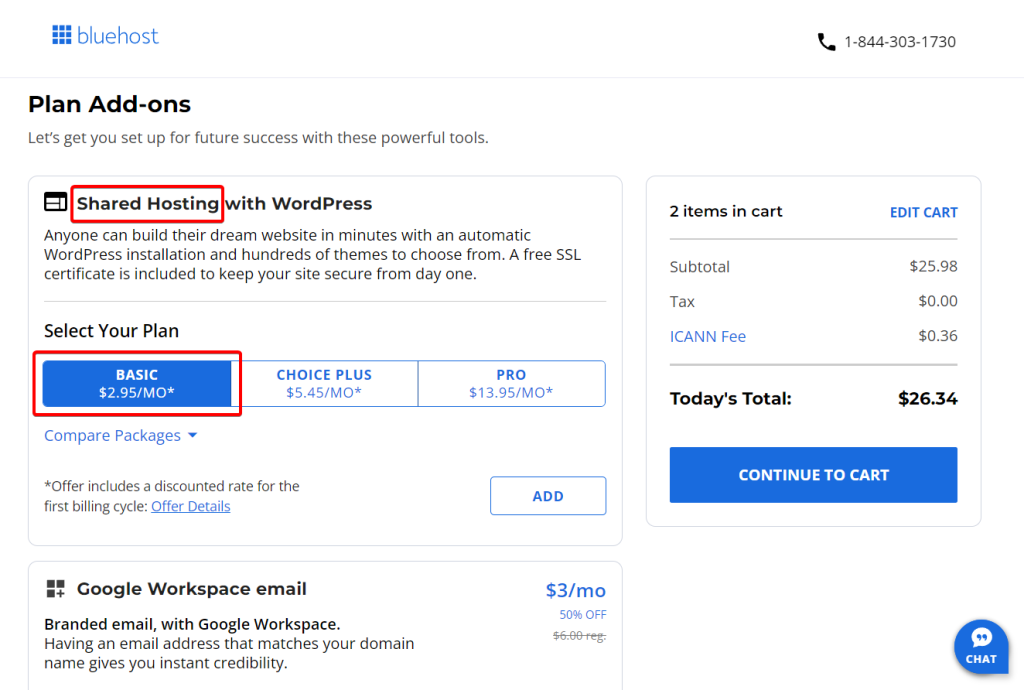
It should take you just a few minutes to register and make the payment. When it’s done, you will have a domain name and a hosting server ready to be used to make a WordPress website.
Step 2: Installing SSL Certificate
Before starting the WordPress site-building process, let’s install the SSL certificate.
An SSL (Secure Sockets Layer) certificate is a digital badge that proves your website is secure and trustworthy. It encrypts data between your site and visitors’ browsers, protecting sensitive info like passwords and credit card numbers.
Installing an SSL certificate is mandatory because Google flags non-HTTPS sites as “not secure”, harming your credibility and search rankings.
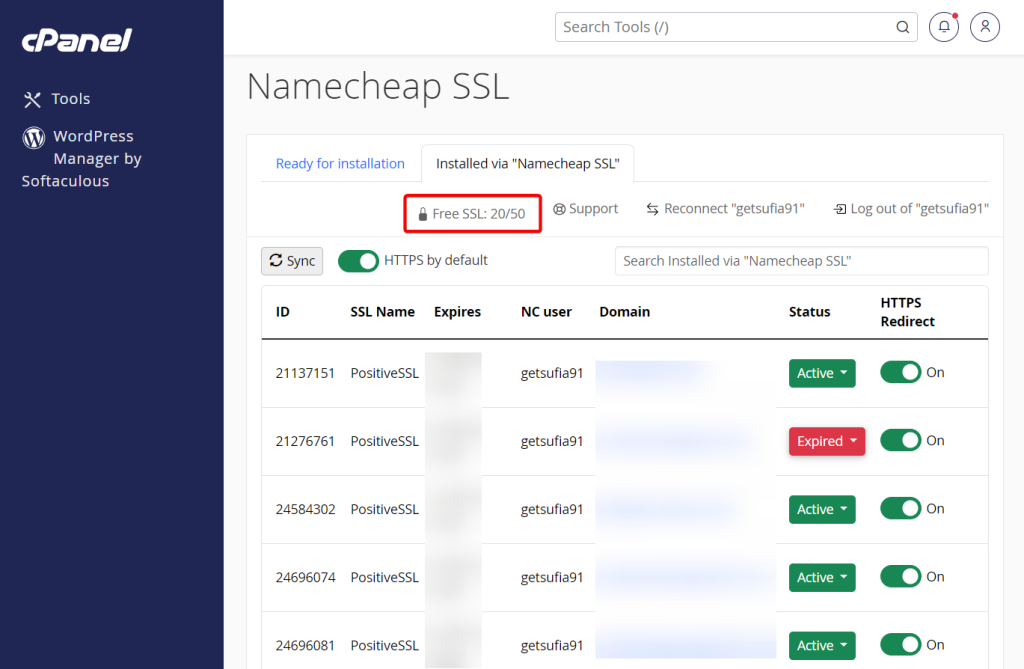
Most hosting providers offer a free SSL certificate for a new account for the first year. You should find options to add an SSL certificate to your website from your hosting account. If you can’t, I suggest getting on a live chat with a support person to guide you.
On my NameCheap account, I can add a free SSL certificate to a new domain by going to the cPanel → NameCheap SSL.
Step 3: Installing WordPress
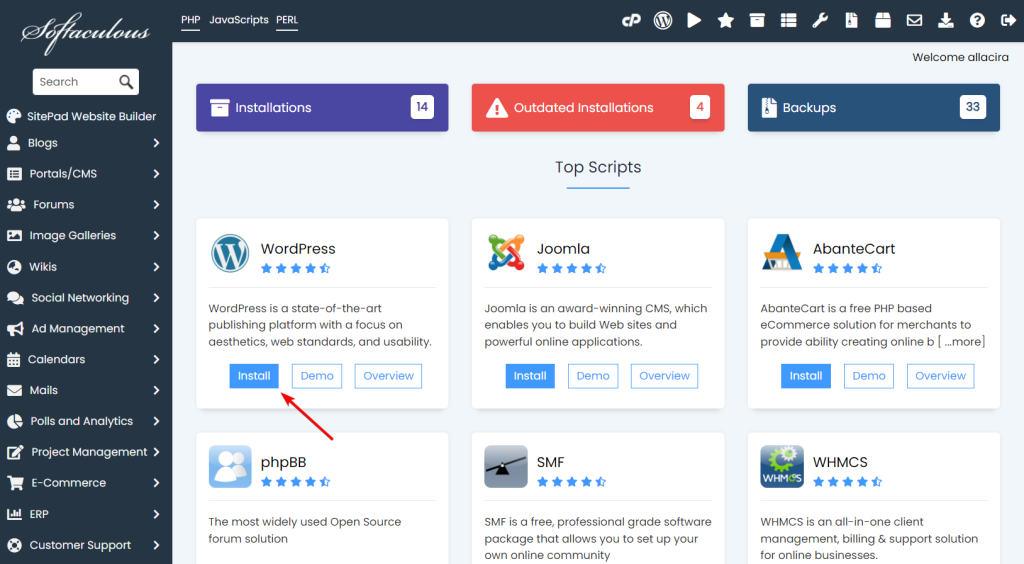
The preliminary steps are over. Now I will show you how to start building the website.
The most common way to install WordPress into your domain is by opening your hosting account and going to cPanel → Softaculous App Installer → WordPress → Install.
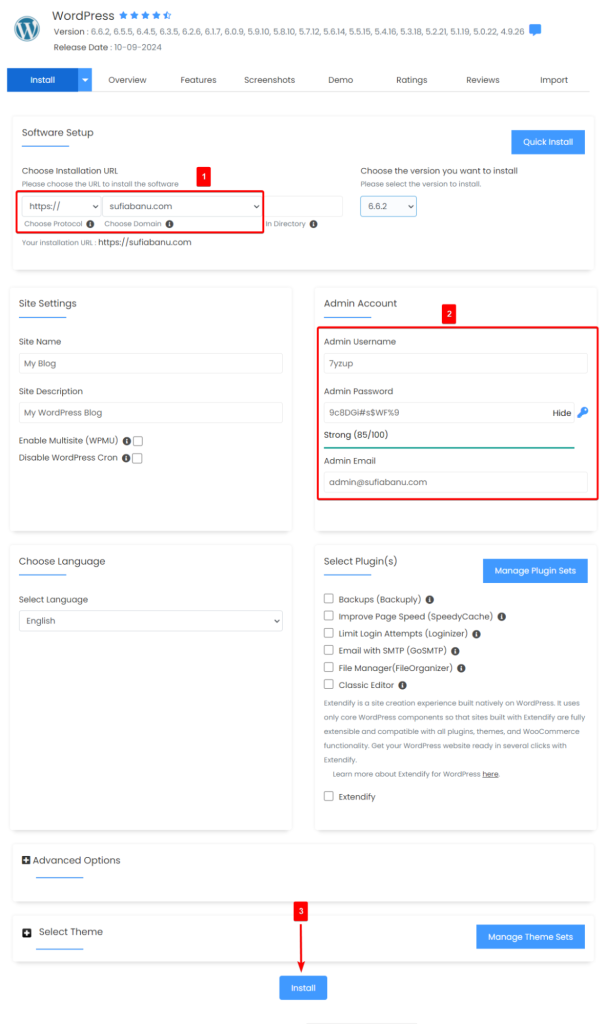
Next, select the ‘https://’ protocol and your domain name from the dropdown menu, add a proper admin name, password, and email address, and then hit the Install button.
WordPress will be installed within a few seconds.
You will receive your website login URL after the installation is complete.
The default login URL of any WordPress website looks like this: https://example.com/wp-login.php.
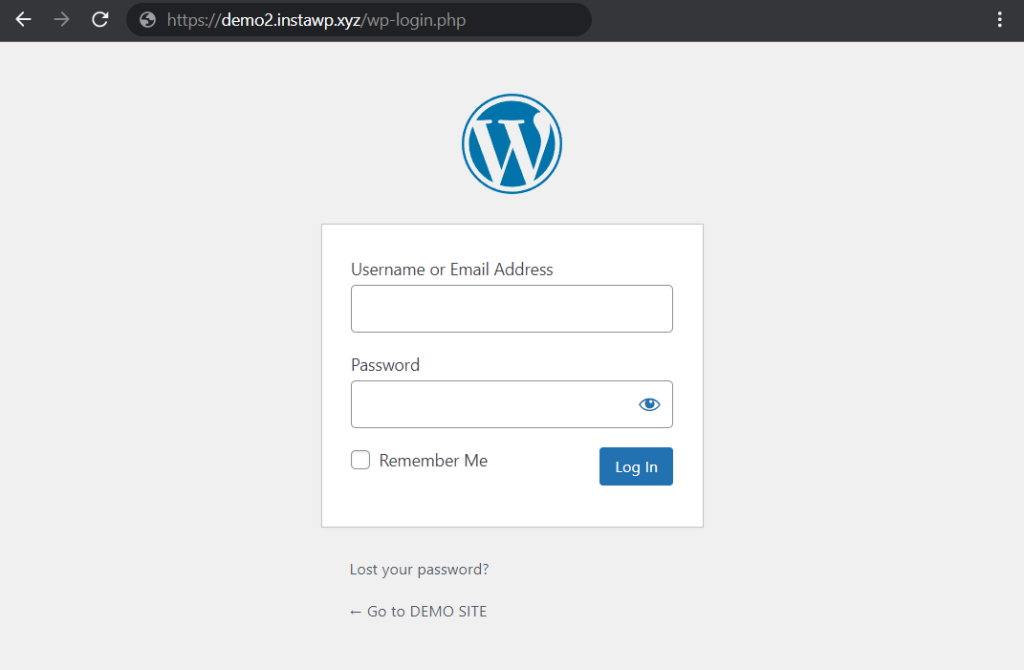
Open the login page and then use your admin name/email and password to log into your brand new WordPress website.
As soon as you log in, the WordPress dashboard will appear on the screen.
Troubleshooting Tip: If you are setting up WordPress in a local environment and encounter the “database connection error” during installation, follow our guide to fixing the XAMPP database connection errors.
Step 4: Setting Up WordPress
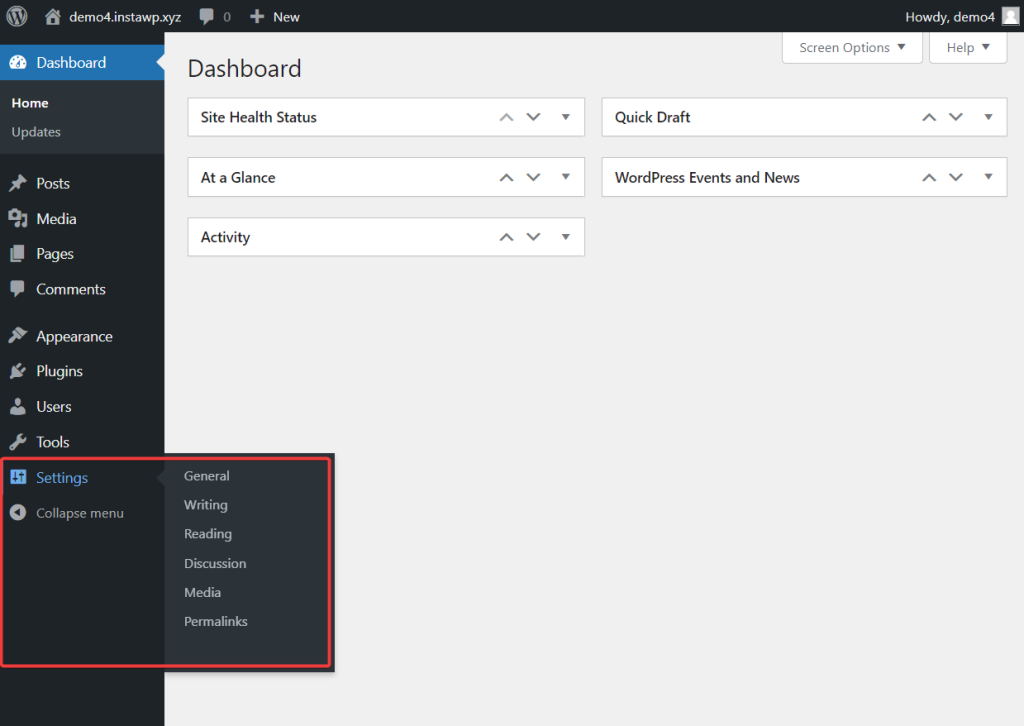
After installing WordPress and logging into the website, you will see before you the WordPress dashboard. This is where you will be configuring your website’s Settings pages.
On the left-hand side of the WordPress dashboard, you will find the Settings option. If you hover your cursor over that option, it will reveal six pages:
- General
- Writing
- Reading
- Discussion
- Media
- Permalinks
These are the default WordPress settings pages. You will need to visit each page and modify it to ensure that your website is running just the way you want it to.
General Settings
On this page, you can customize your site’s basic settings.
Options like Site Title, Tagline, Site Language, Timezone, Date Format, Time Format, and Week Starts On are self-explanatory. Please go ahead and modify them as you wish.
As for the options that aren’t self-explanatory (like Membership, WordPress & Site Address, etc), let’s take a deep dive into each option and learn how to modify them.
WordPress Address & Site Address: These options are a bit tricky to understand for newbies who are not used to operating WordPress websites. For now, all you need to know is that your domain name (example: https://example.com) should be inserted in the WordPress Address and Site Address fields.
The domain name of my demo site is “https://demo4.instawp.xyz” so that’s what I inserted in the WordPress and Site Address fields.
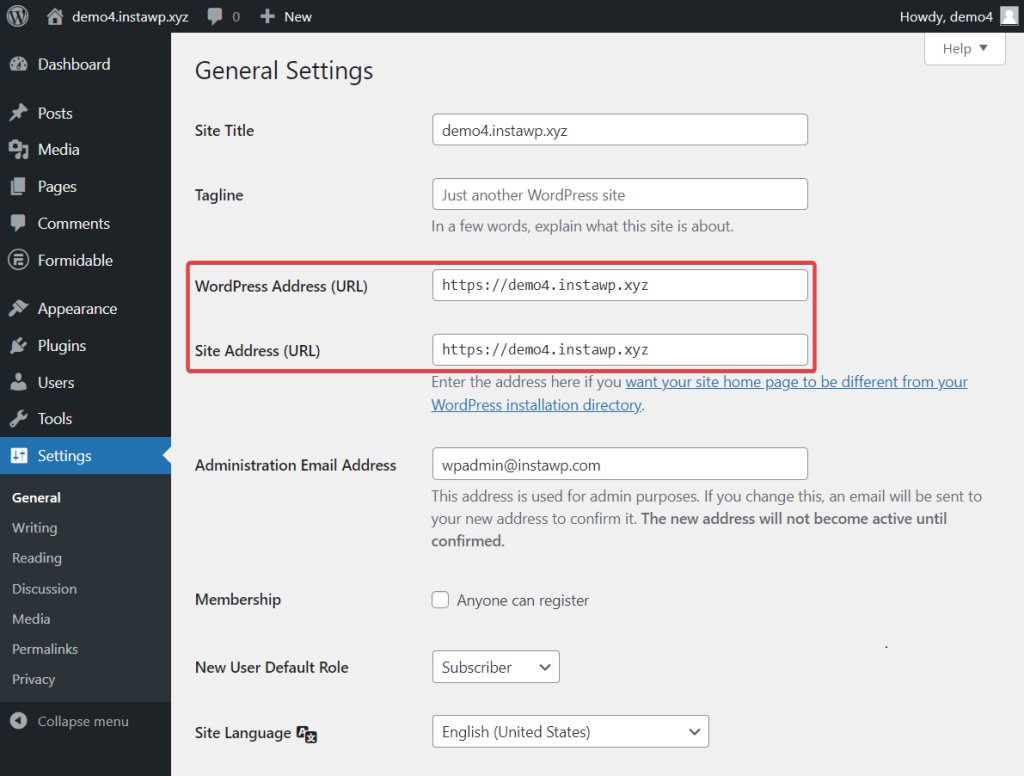
Administration Email Address: In this option, you need to insert the email address that WordPress will use to communicate with you. While running the site, you will encounter events like site crashing, admins adding new users to your site, and visitors leaving comments on your posts, among other things. WordPress will inform you about these events via the email you insert in this field.
Membership: Keep this option unchecked. You need it only when you are building a membership site.
New User Default Role: Right now, you are the sole user of your WordPress site. In the future, you will be adding more users to the site. And when you do that, you will have to give them user roles like Editors, Authors, Contributors, or Subscribers. If you set a default user role, then WordPress will ensure that all new users added to your website will be assigned to that role.

Writing Settings
On this page, you will configure settings related to your posts. Let’s take a look at the options:
Default Post Category: Every article that you publish on your WordPress website has to have a category. A category can be assigned to a post in the Gutenberg editor.
If you ever fail to assign a category to a published post, WordPress will assign a default category to the post.
The Default Post Category option allows you to choose a default category for uncategorized posts. For now, you can choose Uncategorized as the default posts category.
Later, when you learn how to create custom categories, you can return to this page and set a different default category.
Default Post Format: This option defines how the posts are going to look on your WordPress site.
If you want to add text posts to your site, then select the Standard format. But if you want to post only images on your site, then select Image or Gallery format. For publishing videos and audio, etc., select the relevant format.
I recommend using the Standard format because it allows you to add images, video, audio, etc., anyway.
Mail Server, Login Name, Password, Default Mail Category: You need to worry about these options when you want to email published posts to your users and subscribers. It’s too early to engage with these features, so I recommend leaving the options as is for now.
Update Services: WordPress uses a service called Ping-O-Matic to alert search engines about a post and page published on your site. That is why the Update Service field is autofilled with Ping-O-Matic’s URL.
In the future, if you don’t want to use that service anymore or perhaps you want to add more services to alert search engines, all you’ll need to do is add the service URL in the Update Services field. For now, you don’t need to make any changes to this field.
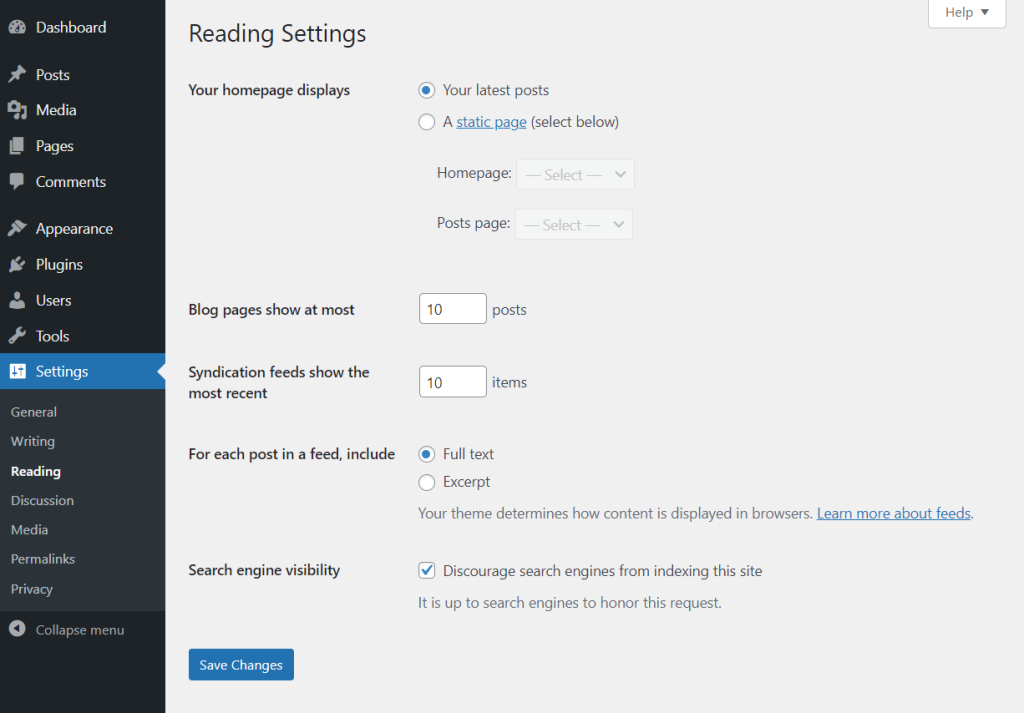
Reading Settings
This page allows you to define how visitors view your website.
Your Homepage Displays: You get to decide how your homepage will look to the visitors of your site. It can be a static page or it can be a page filled with your latest posts.
If you choose the static page option, then you need to define which page is to be used as the static page.
Blog Pages Show at Most: This particular option allows you to define how many posts will appear on the homepage. I consider anything between 10 and 15 a good number.
Syndication Feeds Show the Most Recent: A feed is a system that your site visitors can use to learn about new posts and pages published on your website. This is something you need to consider after your site starts drawing visitors. For now, you can skip this option and move on to the next one.
For Each Post in a Feed, Include: This option is also related to the feed function. Skip it for now.
Search Engine Visibility: Many website owners choose to prevent their sites from appearing on search engines like Google and Bing, typically because their site is not ready for visitors. If you don’t want your site to be indexed right now, then select the checkbox. But remember to return and uncheck the box when your website is ready for visitors.
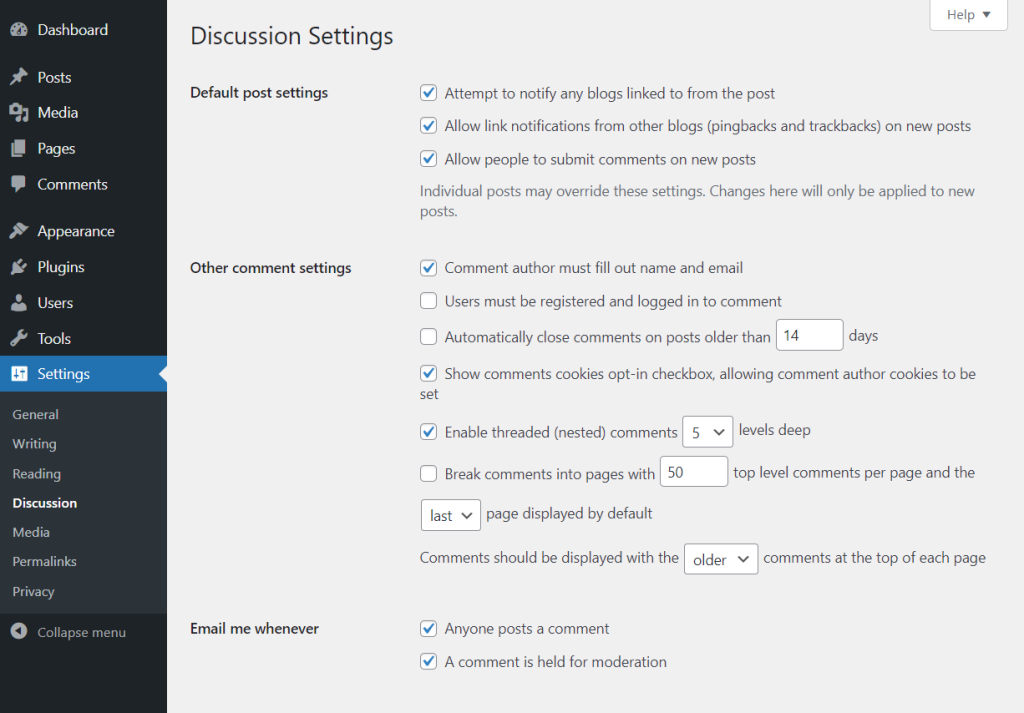
Discussion Settings
On this page, you can define how visitors would interact with your website as well as how your website will interact with other websites.
Default Post Settings: Under this option, you will find three checkboxes.
Selecting the first two checkboxes will ensure that WordPress notifies (or pings) you when a post or a page from your website is linked to other websites.
Selecting the third box will allow you to receive a notification whenever visitors leave a comment on your posts or pages.
Other Comment Settings: Select the first checkbox because it will help deter spam comments from your posts and pages.
All the other options in this section are self-explanatory. I recommend going ahead and choosing the options that you feel are necessary for your website.
Email Me Whenever: Under this option, you have two checkboxes.
The first checkbox ensures that you receive an email notification every time someone leaves a comment on your website. The second one ensures that you receive an email notification when a comment is held in the moderation queue because it will need to be manually approved before it can appear on your site.
Before A Comment Appears: You will find two checkboxes under this option as well.
By selecting the first checkbox, you are telling WordPress to withhold all visitor comments because you want to manually approve them first.
By selecting the second checkbox, you are telling WordPress to auto-approve comments left by visitors whose previous comments were approved.
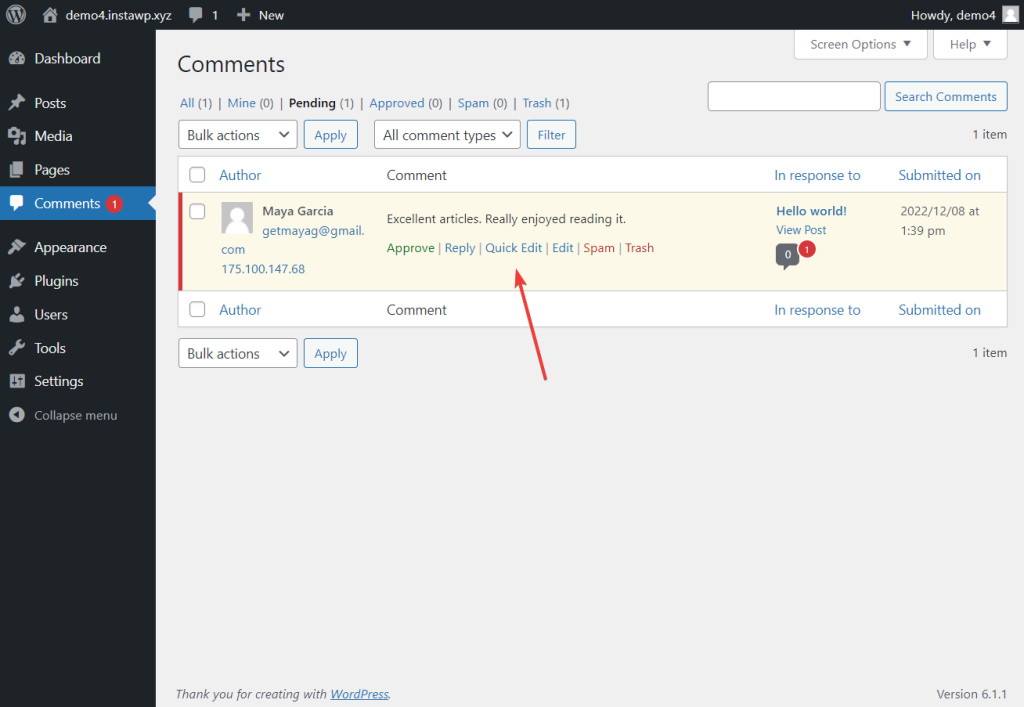
Comment Moderation: When leaving comments on your site, some visitors are going to add links to other websites within the comment. In the Comment Moderation field, you can decide how many links a visitor can add to his/her comment. Comments left with links beyond the defined number of links will be withheld. You will need to manually approve or disapprove such comments.
Avatars: An Avatar is an image that will appear next to your name when you reply to comments left on your site. You can choose to enable or disable avatars by checking or unchecking the checkbox.
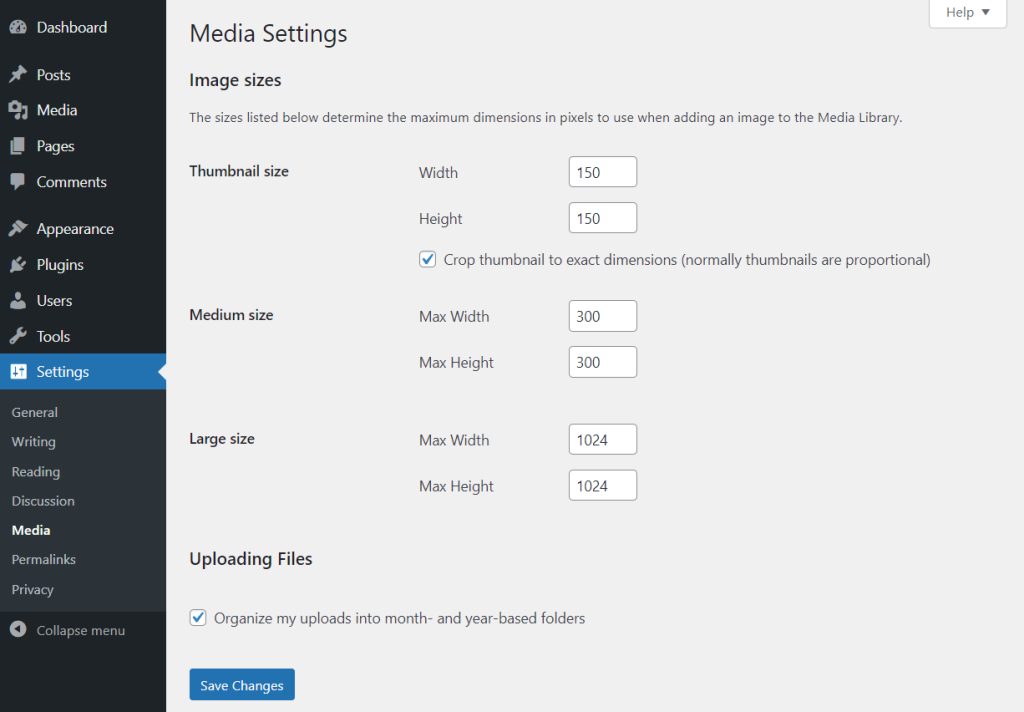
Media Settings
The options on this page will help you configure images uploaded to your WordPress site.
WordPress assigns a default size to uploaded images, but you can choose to modify the default size if you need to.
I don’t recommend changing the default size unless you are running an image-heavy website (example: photography site) where the images need to be a lot bigger to be presentable to visitors.
Image-heavy sites can also select the checkbox under the Uploading Files option. This will ensure that the images are organized into months and year-based folders. Should you ever need to check image archive dates, these folders will come in handy.
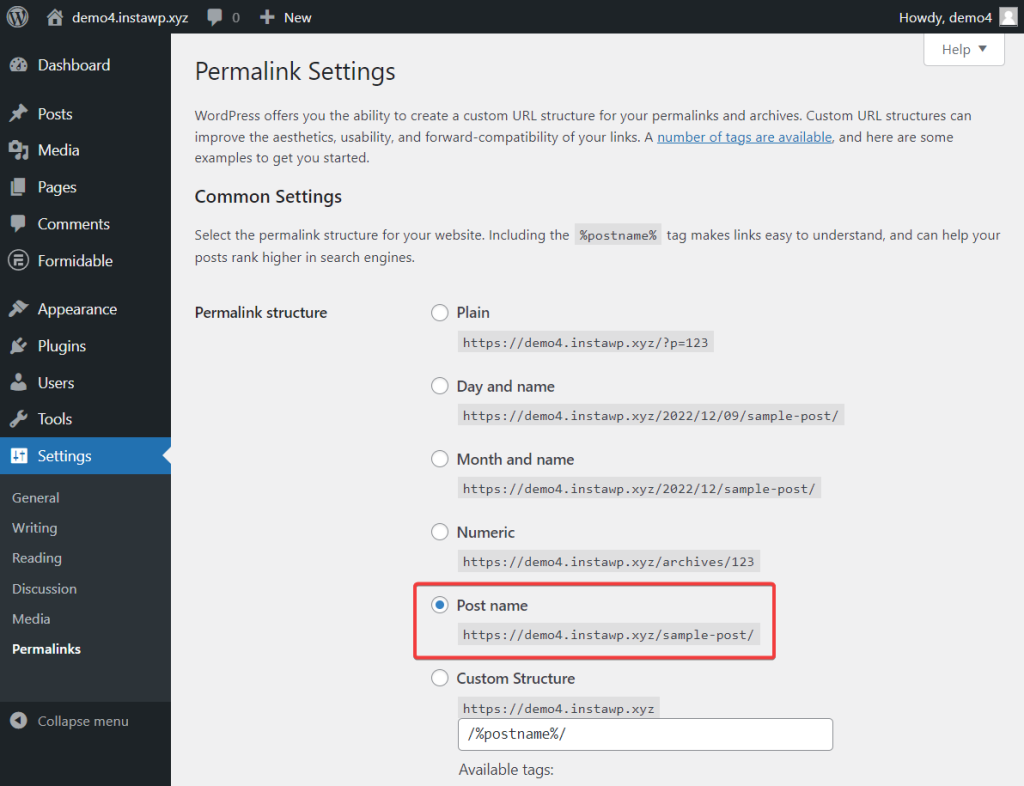
Permalinks Settings
Permalinks are the URL structures of a website. These structures differ from site to site. For instance,
- The URL structure of an article on our website is: https://ctrlwp.com/build-wordpress-site/
- The URL structure of a new article on The Guardian is: https://www.theguardian.com/us-news/2022/dec/12/bernie-sanders-kyrsten-sinema-senate
See the difference?
There are many ways to structure permalinks. The permalink or URL structure of my website is called Post Name. This is the most commonly used permalink structure, and I recommend using it unless your website is very time-focused, like a news site. In that case, the Month and Name structure is most suited for your website.
Be sure to carefully consider the permalink you want to use on your WordPress website.
After choosing the permalink structure, scroll down to the section called Optional.
In this section, you can create custom URLs for your category and tag archive pages.
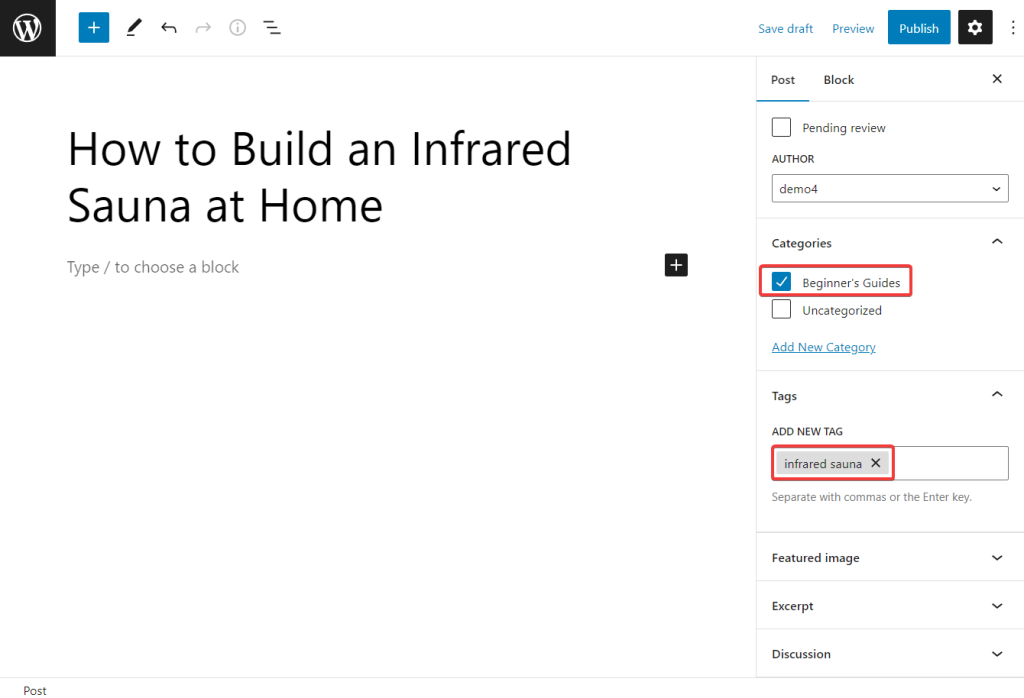
Categories and tags are the two primary ways to group content on a WordPress website. Categories allow you to broadly group post topics, and tags allow you to describe your post in more detail.
For instance, let’s say you have a website where you regularly blog about saunas. You create 10 posts about portable, steam, and infrared saunas. You will tag each post according to the type of sauna (example: portable, steam, and infrared) and categorize the posts as Beginner’s Guides and Tips & Tricks.
So an article on “How to Build an Infrared Sauna at Home” will be categorized under “Beginner’s Guides” but will contain the “infrared sauna” tag.
If you open a category and tag page on your WordPress website, the URLs will look like this:
- https://example/category/beginners-guide/
- https://example/tag/infrared-sauna/
In the Optional section, you can change the words “category” and “tag” to something else, like “guides” and “tutorials,” then the URLs will look like this:
- https://example/tutorials/beginners-guide/
- https://example/guides/infrared-sauna/
I recommend keeping the category and tag URL as is for now and changing it in the future only if you need to.
IMPORTANT: After setting the permalink structures, if you modify them in the future, it will have severe effects on your search engine ranking. You will experience a sharp decline in organic traffic and revenue collection. This is why I strongly recommend choosing your permalink structures carefully and avoiding permalink structure modifications later.
Security Note: The WordPress login page is arguably the most vulnerable part of your WordPress website. After setting up the WordPress pages, I recommend strengthening your site’s login security by following these WordPress login security best practices.
Step 5: Adding Themes & Plugins
Themes and plugins are the software that bring your WordPress website to life. Themes determine the overall look and feel of your site, while plugins add new features and functionality.
Installing Themes
When it comes to themes, you only need one to get started. Begin by visualizing the design you want, and then search for similar themes in the WordPress repository. The best part? All themes in the repository are free or offer a free version, so you can try out different designs without breaking the bank.
If you’re feeling overwhelmed, start with one of the official WordPress themes. They’re well-designed, easy to use, and a great place to begin.
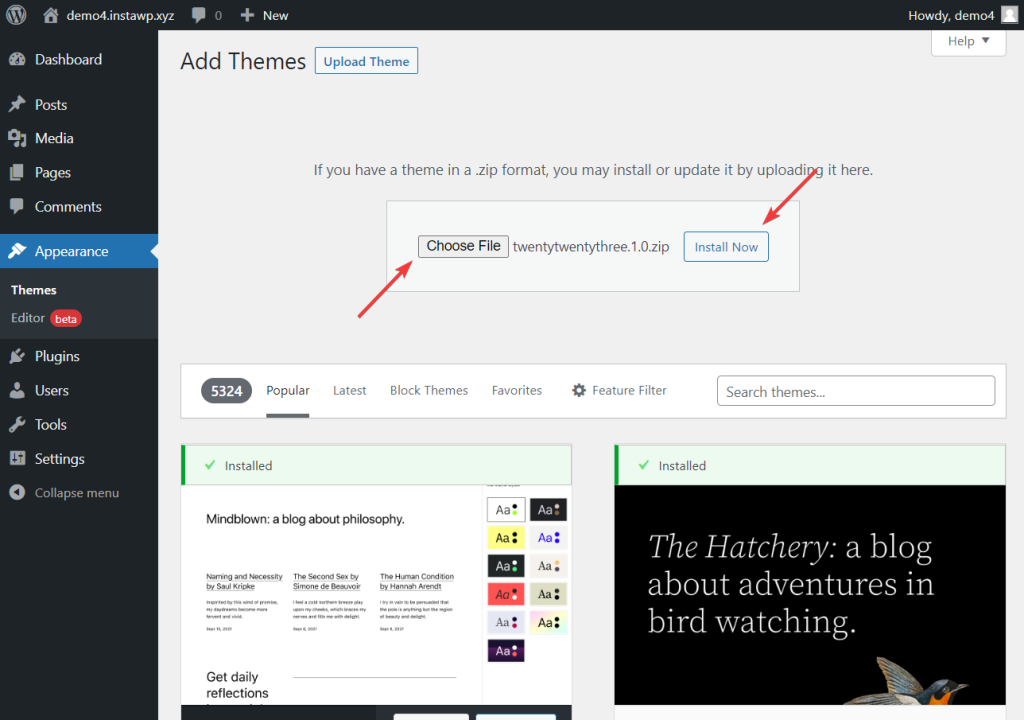
To install a theme, follow these steps:
- Download the theme from the WordPress repository
- Log in to your WordPress dashboard and navigate to Appearance → Themes → Add New → Upload Theme
- Upload the theme by clicking Choose File, and then hit Install Now
- Once the installation is complete, click the Activate button to make the theme live on your site.
That’s it! You’ve successfully installed a theme on your WordPress site.
Installing Plugins
Unlike themes, you can install as many plugins as you need on your WordPress site. The key is to figure out which plugins you need to achieve your website’s goals. For example, a marketing blog might need email opt-in plugins, while a photography site might require gallery plugins.
To install a plugin:
- Search for a plugin you need in the WordPress repository, which boasts over 60,000 options
- Download the plugin and then log in to your WordPress dashboard
- Navigate to Plugins → Add New → Upload Plugin
- Upload the plugin by clicking Choose File and then hitting Install Now
- Once the installation is complete, click the Activate button to make the plugin live on your site
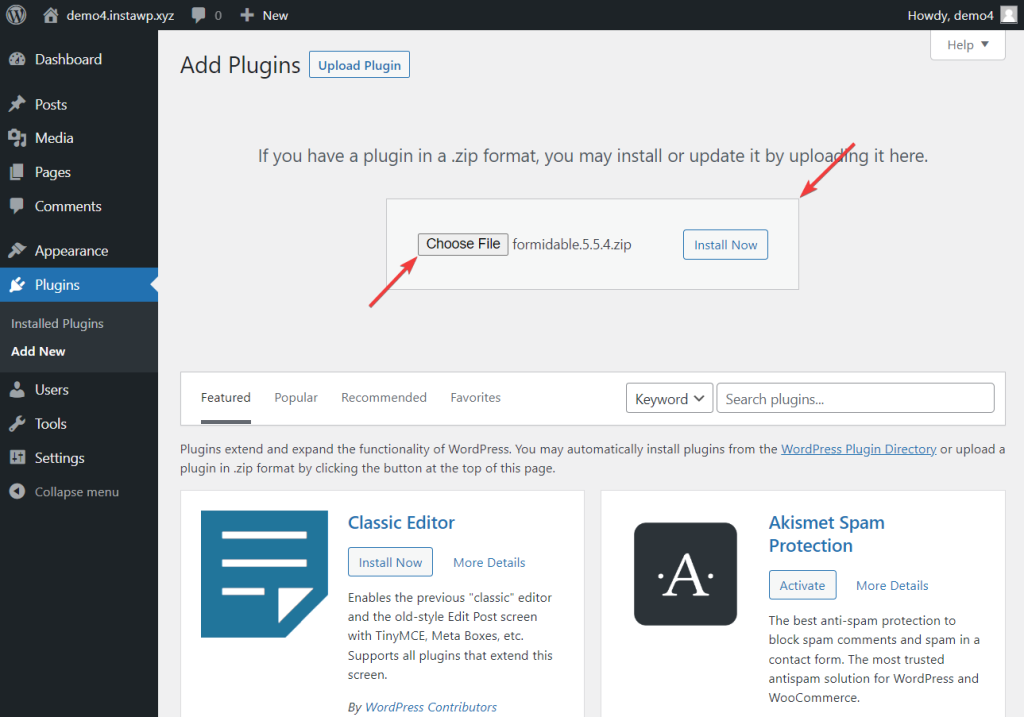
After activation, you can access the plugin’s settings pages from your dashboard menu.
Security Note: As you customize your site with themes and plugins, ensure they come from trusted sources. Malicious or poorly coded extensions can trigger browser warnings like Deceptive Site Ahead, which may scare away visitors. If your site gets flagged, don’t panic! Our guide on how to fix the Deceptive Site Ahead warning in WordPress explains step-by-step how to resolve it, from scanning for malware to submitting a review request to Google.
Step 6: Adding Content (Posts & Pages)
Content in a WordPress website can be added in the form of a post or a page. You can add text, images, buttons, lists, quotes, embed links, audio, video, etc., into these posts and pages. Just ensure that pages are used to create timeless content like product feature lists, contact information, terms of service, privacy policies, etc., while posts are used to create timely content like articles, news, deals, and discounts.
To add posts to your WordPress site, go to Posts, select Add New, and an editor will appear on the screen. This is WordPress’s built-in editor called the Gutenberg Editor. You will be using the same editor to add pages (Pages → Add New) to your site.
The Gutenberg Editor is a powerful tool, but it has a learning curve, and you will need to dedicate some time to master it. Using the editor may feel overwhelming at the beginning, but once you get the hang of it, you will start seeing its true potential.
Here’s a guide that will help you learn how to use the WordPress Gutenberg Editor.
Pro Tip: The WordPress admin bar can clutter your site’s frontend view while editing – if you’d prefer a cleaner visitor perspective, follow our tutorial on how to hide the admin bar for specific user roles or sitewide.
Final Thoughts
As you can see, building a WordPress website is not difficult, but it’s a time-consuming process. For newbies, there’s an enormous learning curve involved, and it can take a couple of hours to get a website up and running.
One way to ensure that you don’t spend more time than you need to is by following a good tutorial that guides you every step of the way, thereby reducing any chances of making a mistake.
That is what I tried to achieve with this article. I laid out the steps to build a basic WordPress website, and if you followed the tutorial carefully, by now you should have a WordPress website ready.
What you’d want to do next is market your website to your friends, family, colleagues, and anyone who would be interested in drawing some initial traffic to your site. Afterward, strategize a plan for growing your website and taking your business to the next level.
That’s it for this one, folks! If you have questions about how to build a WordPress website, please let me know in the comments below.