KleverList Plugin: First Impressions & Walkthrough
All product reviews are based on hands-on testing using our internal review methodology. We work directly with product makers to ensure our content is accurate and helpful to readers. Learn more about our marketing service.
Kleverlist is an email marketing plugin designed to help WooCommerce store owners with their email marketing efforts. I received access to the plugin from the developer (Paolo – cool guy!) and got to test drive the plugin on my demo site!
In the following review, I will discuss the plugin’s offerings and try to understand how it helps create effective email marketing campaigns and improve customer engagement, loyalty, and conversion rates.
Highlights
Exclusive 20% Discount Coupon Code for CtrlWP users – CTRLWP20
(Verified code | Not working? Contact us)
KleverList WooCommerce Email Marketing Plugin Features
Here’s a quick dive into the plugin features:
1. Automated Behavioral Product-Based Tagging
KleverList allows you can set automated customer tagging based on order status, gain valuable insights into customer behavior without any manual effort, and tailor your engagement strategies accordingly.
The advanced behavioral tagging feature automatically adds product tags to contacts within your email marketing tool, allowing you to create personalized communications and segment your audience based on their product interests and purchase history.
Let’s say, you run an online bookstore using WooCommerce. When a customer purchases Dune, they’re automatically tagged with Sci-Fi Reader and Dune Fan. If they leave a review, they get an additional Active Reviewer tag.
Meanwhile, product-based tagging adds specific tags like Hardcover Buyer or First Edition Collector based on the exact product variant.
These tags are synced to your email marketing tool and can be used to create highly targeted campaigns.
For instance, you could send a special offer on the Dune Messiah sequel to all contacts tagged Dune Fan who hasn’t yet purchased it or invite all Active Reviewer tagged customers to join an exclusive book club newsletter.
2. Comprehensive Customer Data Mapping
Link specific customer information fields from your WooCommerce store to corresponding fields in your email marketing tool. By mapping data such as name, location, or purchase history, you can create more organized and detailed subscriber profiles.
You can also connect various WooCommerce data points, including billing details, user information, and order history, to your email marketing tool lists.
By mapping this diverse range of data, you can create better customer segments based on location, purchasing behavior, business type, and transaction patterns.
3. Advanced List Segmentation
You can map individual products or entire product categories to specific or general email lists in your email email marketing tool. This granular control enables you to create highly targeted email marketing campaigns based on customer purchase behavior and preferences.
With KleverList, you could map your Science Fiction category to a SciFi Enthusiasts email list, while individual bestsellers like Dune could be mapped to a Frank Herbert Fans list.
Customers who purchase Dune are automatically added to both lists.
This allows you to send general science fiction recommendations to all SciFi buyers, while also targeting Dune purchasers with more specific content, such as promotions for other Frank Herbert books or exclusive Dune merchandise.
4. Re-engage & Unsubscribe Users
With KleverList, you have the option to resubscribe previously unsubscribed users and get a second chance to reconnect with customers who may have lost interest in your store. This can be a powerful way to re-activate dormant customers.
You can also unsubscribe users from certain lists upon order completion after they’ve been added to new lists. This level of control is also available at the product level, allowing you to automatically unsubscribe users from specific lists upon order completion for each product in your catalog.
5. Assign Products to Specific Email Lists
Assign specific email lists to individual products, multiple products, or an entire product catalog. This means when customers buy a product associated with a specific email list, they will be automatically added to that list.
Additionally, you have the flexibility to exclude specific products from this integration, meaning you can choose which products to associate with specific email lists and which ones to exclude, which will ensure that your email marketing efforts are always aligned with your business goals.
Let’s say you want to set up email subscriptions for all the books in your Best Sellers category, which includes popular titles like Dune, 1984, and To Kill a Mockingbird.
You can assign the Book Lovers email list to the entire Best Sellers category so that whenever a customer buys any book in that category, they will be automatically added to the Book Lovers email list.
However, you may not want to include some books in this email list, such as The Art of War which is also in the Best Sellers category but is more of a niche interest book. To exclude The Art of War from the Book Lovers email list, you can simply exclude it from the integration.
This way, customers who buy The Art of War will not be added to the Book Lovers email list, but customers who buy Dune, 1984, or To Kill a Mockingbird will still be added.
6. Data Migration & GDPR-Compliant Consent
You can import your existing customer data from your WooCommerce store to your email marketing tool and leverage historical customer data without the need for manual data entry.
Also, add users to email lists only with their explicit consent.
The plugin includes customizable privacy settings for the checkout page, ensuring your store meets privacy regulations while building an email list.
These are the main offerings of the KleverList WooCommerce Email Marketing plugin. Now, let’s look at the pricing plans.
KleverList Plugin Pricing
KleverList has a free plugin and a paid one!
With the free plugin, you can create list segmentation, map customer data to email lists, automate customer insights with free behavioral tagging, re-engage with previously unsubscribed users, and instant integration across one, multiple, or all products.
To access advanced features like mapping of WooCommerce billing, user, and order information, advanced tagging for personalized communication and segmentation, customizable privacy consent, granular unsubscribe options, and migration of existing customer data, you need the paid plugin.
The paid plugin has 3 pricing plans. Those are:
- Pro plan costs $59 per year for a single website
- Pro 5 costs $169 per year for 5 websites
- Pro Max costs $249 per year for 10 websites
Every paid plan offers access to all the free and advanced features.
Learn more about KleverList pricing plans.
How to Start WooCommerce Email Marketing With KleverList
I’m going to show you how to set up KleverList with Mailchimp. You might choose a different email marketing tool and that’s okay because the steps to connect with other email marketing tools are almost similar.
If you prefer video tutorials then watch this:
Step 1: Install & Activate KleverList
For this demonstration, I am using the paid KleverList plugin.
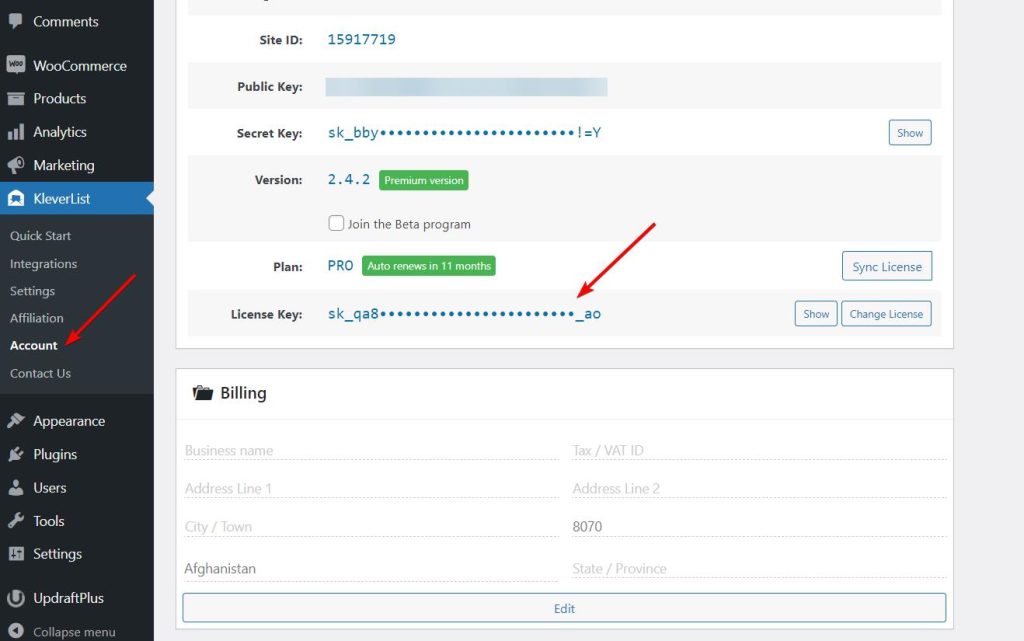
Install and activate the plugin on your WooCommerce store and add your unique license key (only for paid plugin users) by going to KleverList → Account on your WordPress dashboard.
Step 2: Connect With Mailchimp Email Marketing
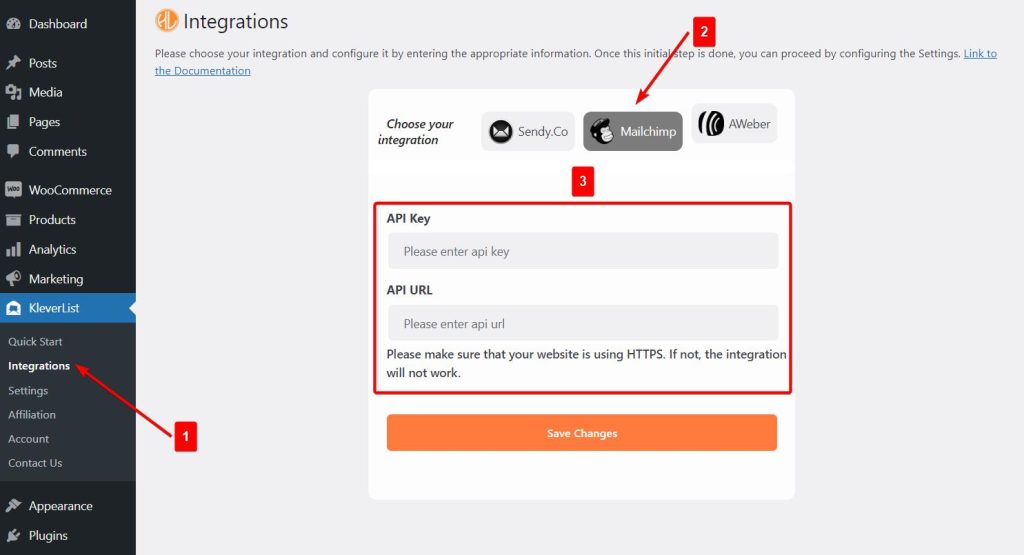
Connect KleverList with your email marketing tool. Navigate to KleverList → Integrations and select the tool. I selected Mailchimp.
Add your Mailchimp API key and URL which can be found on your Mailchimp account.
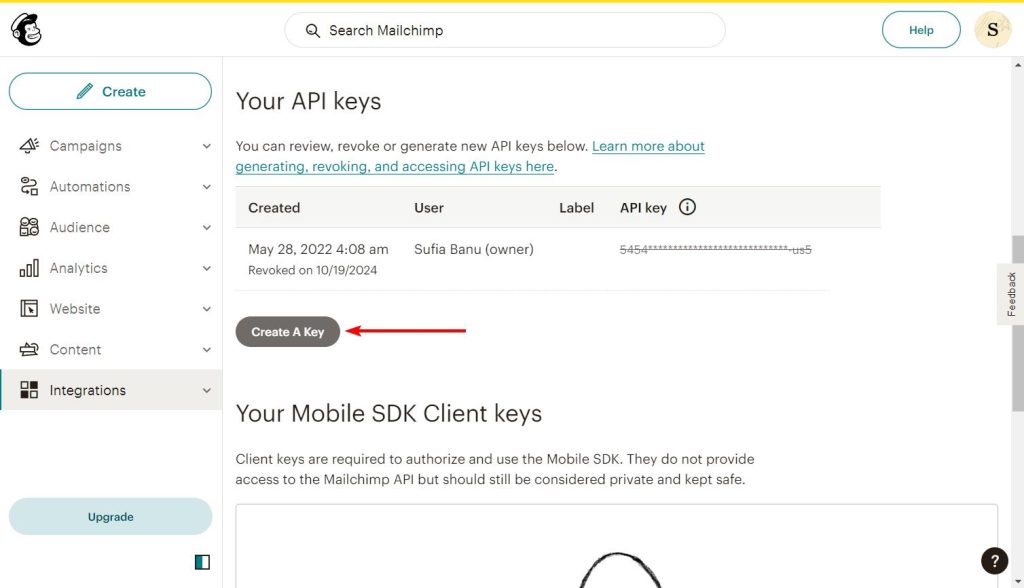
On your Mailchimp account, go to your profile → Extra → API keys and select the Create A Key button.
On the next page, add an API key name and hit the Generate API button to create a new API.
Make sure to copy and store the key on a safe page.
Add the key to KleverList and for the URL, add this: https://<dc>.api.mailchimp.com/3.0/
IMPORTANT: Be sure to remove “<dc>” from the URL and add the final part of the key which looks like this “usx” to the URL.
When the connection has been established, it’s time to make another connection between your store and your Mailchimp contact list (called Audience). From the dropdown menu, choose the contact list and hit the Load the Audience button
If you don’t already have a contact list, then create one.
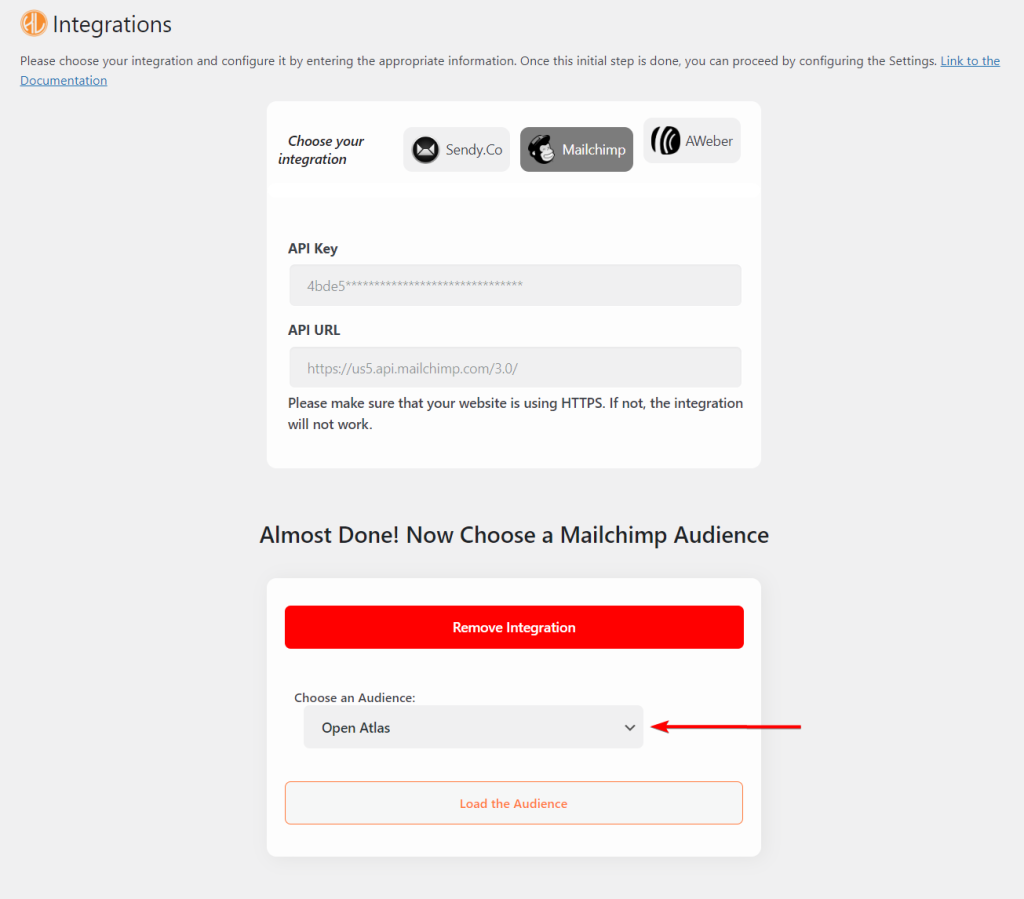
That’s it. You have now integrated KleverList with Mailchimp.
Step 3: Configure General Setting
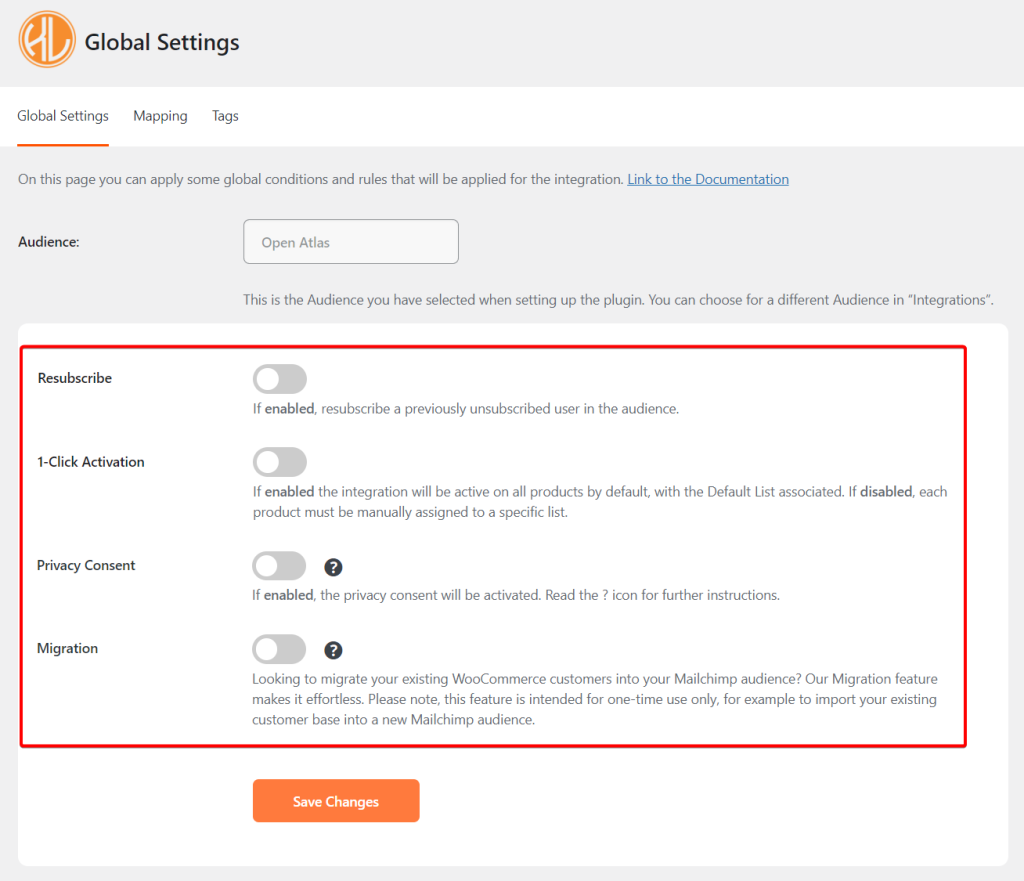
On your WordPress dashboard, go to KleverList → Settings.
Here, you can
- Resubscribe a previously unsubscribed user in the contact list you added in the previous step
- Assign the contact list to all the WooCommerce products of your store
- Add a privacy consent checkbox on checkout pages
- Migrate WooCommerce users to Mailchimp
Toggle on any of these options if you feel the need to. Or else, let them be and proceed with the next steps.
Step 4: Mapping Fields
Mapping allows you to link specific fields from your Mailchimp account to corresponding fields in KleverList, enabling the seamless transfer of data between the two systems.
Navigate to Mapping on the Settings page. Here you will see that the mapping fields are divided between demography, geography, B2B, behavioral, and transactional mapping.
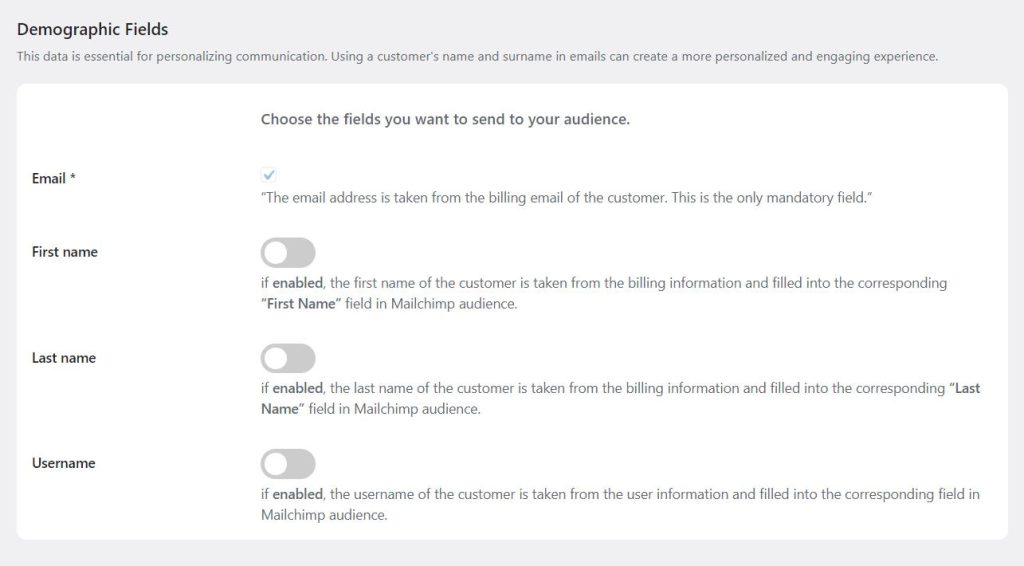
In the demography mapping section, you can link Mailchimp fields to KleverList fields containing demographic data, such as name, email, and birthdate, to create a unified customer profile.
Geography mapping connects Mailchimp fields to KleverList fields containing geographic data, such as country, state, and zip code, to enable location-based targeting and analysis.
B2B mapping connects Mailchimp fields to KleverList fields containing business data, such as company name, industry, and job function, to facilitate business-to-business marketing and sales efforts.
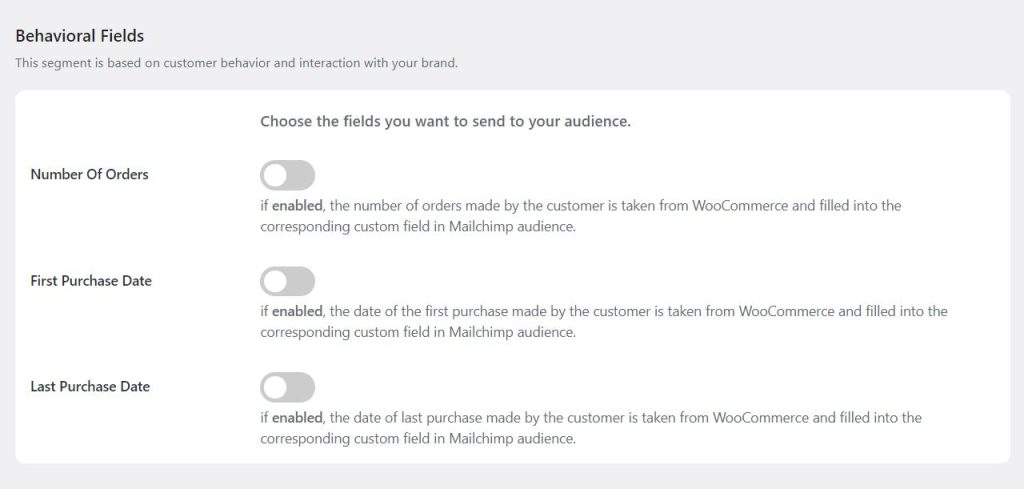
Behavioral mapping links Mailchimp fields to KleverList fields containing behavioral data, such as purchase history and browsing behavior, to gain insights into customer interests and intentions.
Transactional mapping connects Mailchimp fields to KleverList fields containing transactional data, such as order frequency and average order value, to track and analyze customer purchasing behavior.
Each of the mapping sections has fields that can be toggled on. Enabling these fields allows you to transfer and synchronize data between Mailchimp to KleverList in real-time.
You can toggle on the fields based on the data you want to collect.
And don’t worry, even if some of these fields are not present on Mailchimp, enabling them in KleverList will automatically create a corresponding custom field in Mailchimp.
When you are ready, hit the Save Changes button.
Step 5: Tagging Customers
Tagging allows you to assign labels or keywords to specific customers or groups of customers based on their characteristics, behaviors, or actions. These tags can be used to gain insights into customer behavior, segment your audience, and personalize marketing campaigns.
Navigate to Tags on the Settings page. Here you will see 3 tagging options. Those are:
- Order Processing: A tag named “Order Processing” will be automatically added to a customer’s contact in Mailchimp when an order is being processed for a product that has the KleverList integration active.
- Order Complete: A tag named “Order Complete” will be automatically added to a customer’s contact in Mailchimp when an order is completed for a product that has the KleverList integration active.
- Product Tags: Any tags associated with a product in WooCommerce will be automatically added to the customer’s contact in Mailchimp when they purchase that product through the KleverList integration.
I recommend enabling all the tagging options.
Step 6: Assigning Products to Audiences
By assigning products to your Mailchimp audience or contact list, you will ensure that the customer who buys that particular product will be added to the Mailchimp contact list.
There are two ways to assign products to Mailchimp audiences: individually or in bulk.
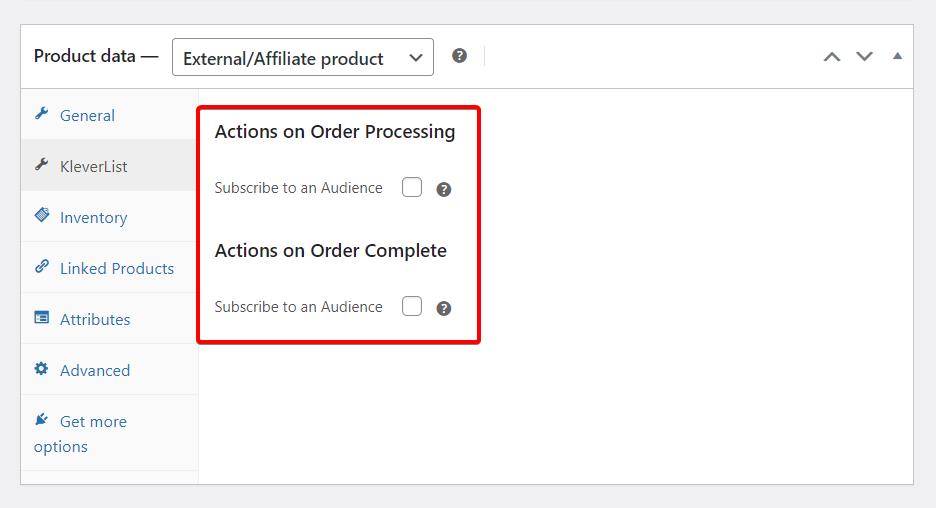
To assign individual products to Mailchimp audiences, edit the product, scroll down to the Product Data → KleverList, and select the two Subscribe to an Audicence checkbox.
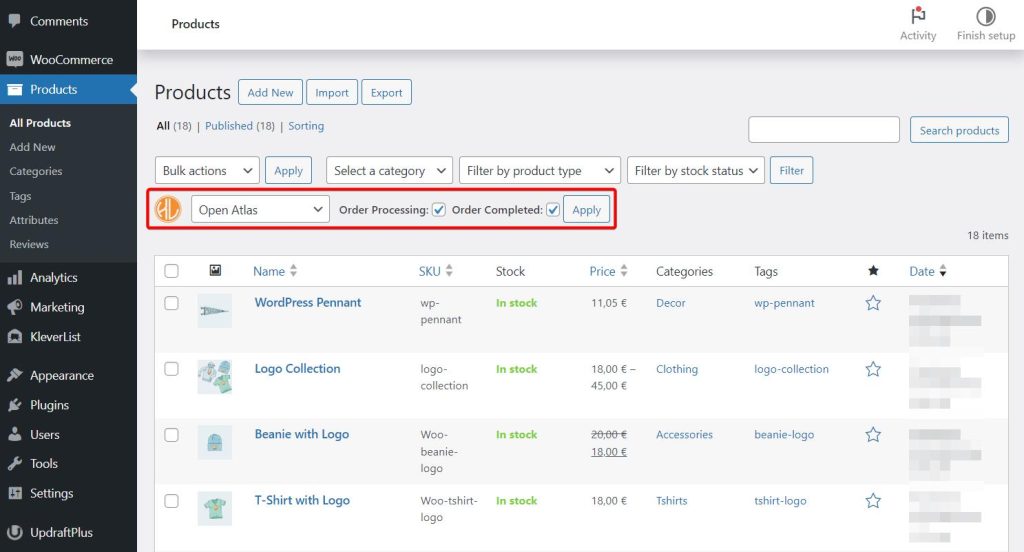
To bulk assign products, go to Products → All Products and select the Mailchimp audience or contact list from the dropdown menu and also select the two Subscribe to an Audicence checkbox.
Require more assistance? Follow these help docs.
And that’s it, folks. You have now configured KleverList email marketing plugin on your WooCommerce store.
Final Thoughts
KleverList is a valuable tool for WooCommerce store owners looking to take their email marketing efforts to the next level.
Its automated segmentation, field mapping, customer tagging, and seamless integration with popular email marketing tools allow businesses to create highly targeted and personalized campaigns that drive engagement, conversions, and ultimately, revenue growth.
It’s super easy to set up and totally affordable.
Give KleverList WooCommerce Email Marketing a try!

