[Fixed] “Deceptive Site Ahead” Warning In WordPress Site
All product reviews are based on hands-on testing using our internal review methodology. We work directly with product makers to ensure our content is accurate and helpful to readers. Learn more about our marketing service.
Seeing the “deceptive site ahead” warning on your WordPress site?
The deceptive site ahead warning is one of the scariest WordPress errors. The red screen preventing visitors from accessing your site is absolutely nerve-racking. And the worst part is, you don’t even know why the warning is showing.
In this article, you will learn about the real cause of the deceptive site ahead warning, along with how to remove it, and the steps you can take to ensure that you never encounter this WordPress error in the future.
Let’s get started.
What is the Deceptive Site Ahead Warning? Why is it Appearing on Your Website?
The deceptive site ahead warning is shown by Google Chrome to prevent visitors from accessing a website that’s infected with malware.
Infected websites expose visitors to inappropriate content or can trick them into giving up important medical or financial information. To prevent this from happening, the Chrome browser blocks visitors from accessing the site and shows them the deceptive site ahead warning.
To remove the warning, you need to clean every trace of malware, secure your site, and inform search engines about the steps you took to ensure that your site is safe to visit.
It’s a long process but don’t worry! We will show you every step that you need to take.
How to Clean Your WordPress Website?
There are 2 different ways in which you can clean your WordPress website. You can either use a plugin or hire a developer to manually clean the site or do it yourself.
In this section, we are going to explore both options. But before we start, take a backup of your entire WordPress website.
Cleaning a hacked website is extremely risky. You might accidentally delete important parts of your website. If you have a copy of the site, it will help you retrieve them.
That said, restoring the backup would mean restoring hacked files to your website. So use the backup only when the situation is extremely dire. For instance, let’s say you hire a developer and he ends up erasing all your posts. In such a case, a backup will be your safety net.
Now, let’s begin with the tutorial.
Step 1: Confirm Hack
The deceptive site ahead warning appears because of a hack. That said, it’s best to confirm that your website was really hacked before you start purchasing a malware removal plugin or hiring a developer.
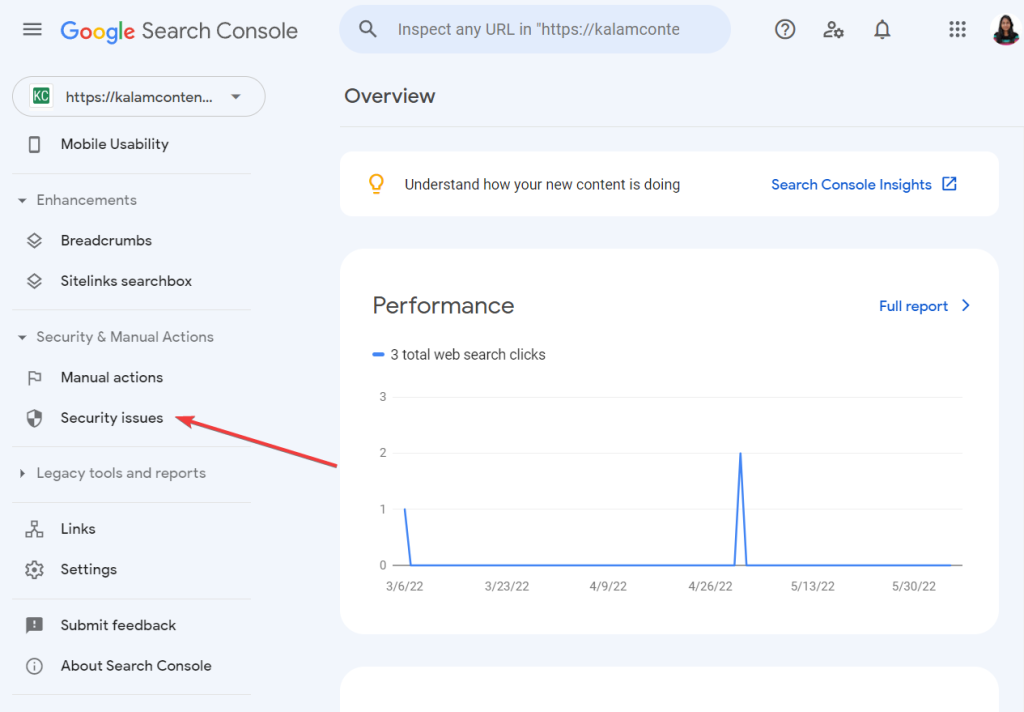
Go to Google Search Console > Security & Manual Actions > Security Issues.
On the next page, Google will tell you that your website has been flagged due to malware infections found on your site. When you are sure that your website is hacked, you can proceed to clean the site.
Step 2: Remove Malware From Site
As we said before, there are two different ways to remove malware from your site. You can either use a plugin to manually clean the site yourself or hire a developer to do it. Let’s take a look at each of the methods:
Manually Clean Your Site
Manual cleanups involve going to the backend of your site and identifying corrupted codes. It also involves deleting the codes without breaking your site. To pull off such a feat, you need to know how to read codes, or else you will end up damaging your site. That’s why manual cleanups should be carried out only by developers who are well-versed in coding.
That said, we don’t recommend manual cleanups whether you do it yourself or hire a developer. It’s a time-consuming and risky process. Failure to clean the site properly will lead to frustration and delay in the removal of the deceptive site ahead of the warning.
But if you still want to manually clean your site, it’s best to seek guidance from experts. Here’s a tutorial from Sucuri, one of the most popular names in website security. It shows you the exact steps you need to take to remove a malware infection from your WordPress site.
Clean Your Site With a Plugin
There are plenty of WordPress malware removal plugins to choose from. Sucuri, Wordfence, MalCare, Astra, and BulletProof Security are the most popular names.
In this tutorial, we are using MalCare because we have first-hand experience with the plugin. It’s reasonably priced and works like a charm. But if you want to choose a different plugin, then this guide will help you make that choice: Best WordPress malware removal plugins.
Now, cleaning your site with MalCare is super easy. All you need to do is install and activate the plugin on your site, add your site to MalCare’s dashboard, and then let the plugin scan your website thoroughly.
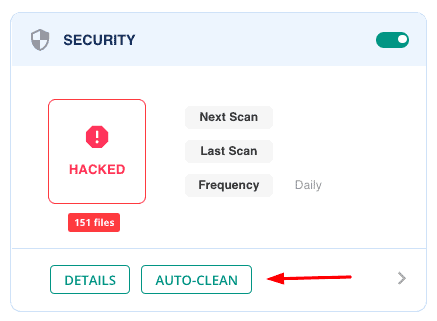
After it notifies you about the malware-infected files it found on your site, you need to start the cleanup by hitting the Auto-Clean button.
Next, you need to enter your FTP details so that the plugin can access your WordPress files and begin the cleanup. It will take a few minutes for MalCare to complete the clean-up process.
Using MalCare is straightforward and we are hoping that using the other malware removal plugins would be as painless. That said, we know that operating a new tool can be a daunting and frustrating experience. So if you need any help while cleaning your site, don’t hesitate to reach out to the support team of the plugin.
Step 3: Update Plugins, Themes & Passwords
Websites are often hacked due to outdated plugins and themes. To mitigate future hacks, update all your plugins and themes immediately after cleaning the site. Nulled plugins and themes cannot be updated, so delete them.
Also, look for rogue plugins and themes installed on your site. After invading a website, hackers install rogue plugins and themes as a backdoor so that they can access your website even after you have cleaned it. To prevent repeated hacks, you need to remove rogue plugins and themes from your website.
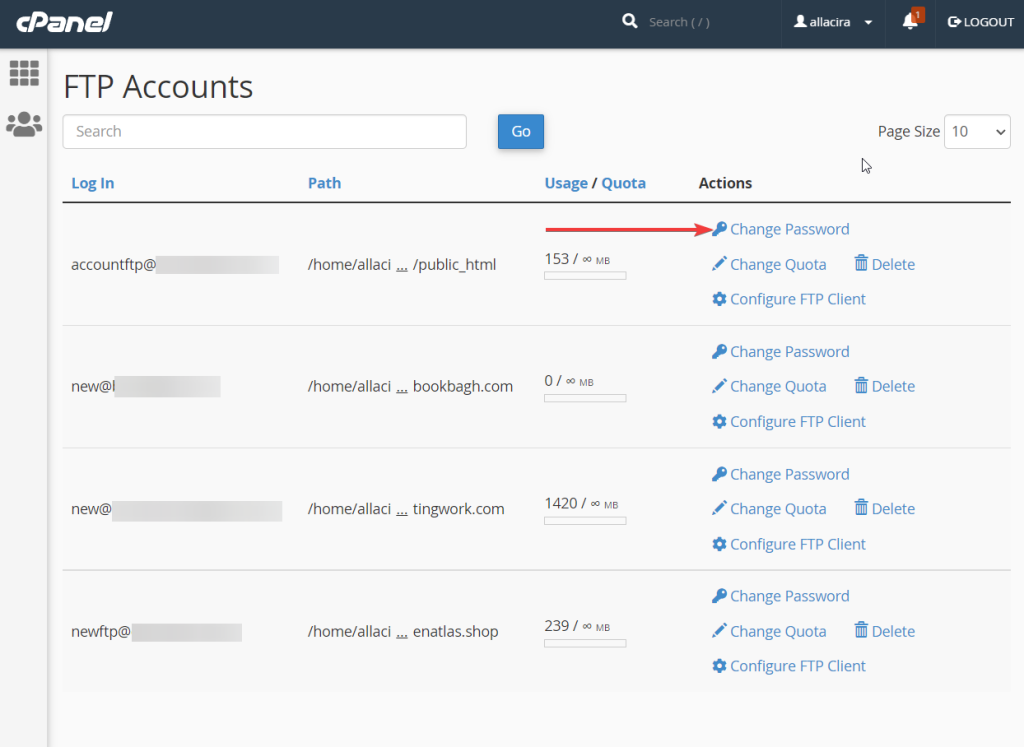
Next, you will need to change the passwords of all your users, FTP accounts, and cPanel accounts. If the passwords have been compromised, hackers will use them to access your site.
You may also want to review your FTP accounts and the users of your site to find and remove rogue users.
Request Search Engines to Remove the Deceptive Site Ahead Warning
So far you have cleaned your site and updated your plugins, themes, and passwords. Next, you need to manually request to remove the deceptive site ahead warning.
But first, make sure that your site is 100% clean. If search engines (i.e. Google & Bing) find a single malicious code on your site, they will flag your site as a repeat offender. You will be prevented from making another request for a while.
If you used a plugin to clean the site, then run a deep scan using the plugin. But if you manually cleaned the site, double-check, and look into every nook and cranny before proceeding to the next section.
Request Warning Removal on Google Chrome
It’s a straightforward process.
Open your Google Search Console, go to Security Issues, and scroll down to the bottom of the page.
You should be able to see an I have fixed these issues option with a checkbox on the left. Select the checkbox and click on the Request a Review button right below the checkbox.
On the next page, you will be asked to fill out a form where you need to write down the steps you took to remove the hack and fix your site.
When you are ready, hit the Submit Request button.
It can take Google up to 3 days to respond to your request.
Request Warning Removal on Bing
To request the removal of the deceptive site ahead warning on Bing, you need to open Bing’s webmaster tool, go to URL Submission, and select the Submit URL button.
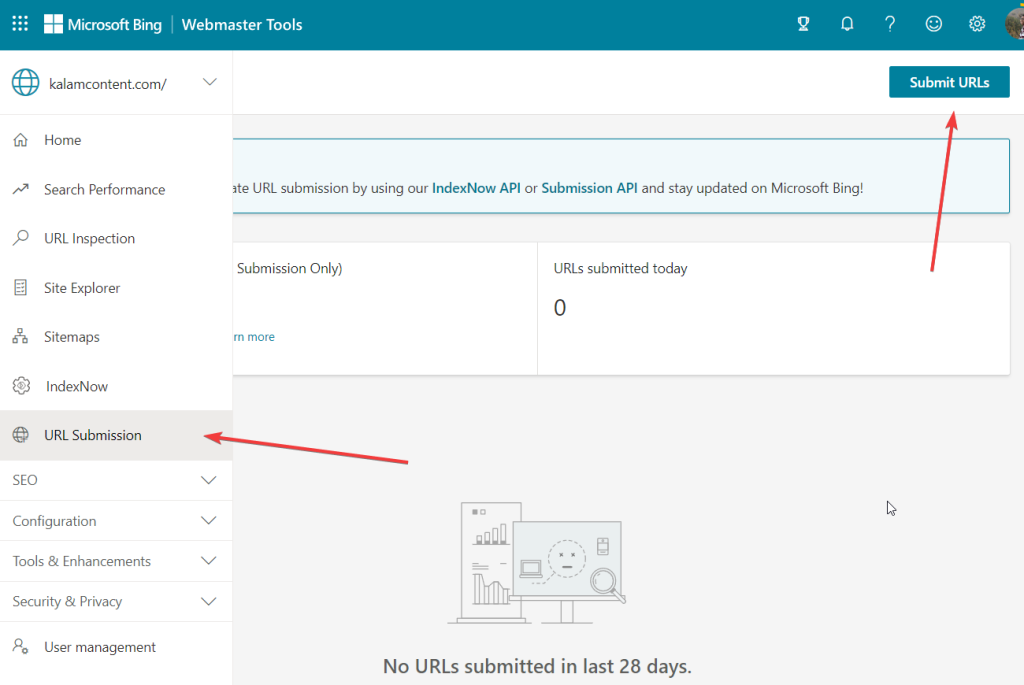
Then enter your site’s URL and hit the Submit button. This will force Bing to crawl the site. Upon seeing that the site is clean, the search engine will remove the warning.
It will take a few days for Bing to respond to your request and remove the warning from your website. But if the warning persists even after two weeks, reach out to Bing’s support team.
That’s it, folks. With that, we have come to the end of this tutorial. Before we conclude the article, you need to take a few precautionary measures to secure your site from future hacks.
How to Prevent the Deceptive Site Ahead Warning in the Future
To prevent the deceptive site ahead warning from appearing in the future you need to make sure that your site is protected from hackers. Take the steps below to secure your website:
1. Install a Security Plugin
Security plugins come equipped with firewalls that prevent suspicious traffic from accessing your site. In other words, a firewall mitigates a threat before it reaches your website.
Security plugins also come equipped with scanners that look for malware infections in your files and folders. If malicious codes are found on your site, the tool helps you remove them and get your site up and running in no time.
Get a WordPress security plugin and install it on your website to deter hack attacks.
2. Keep Your Site Updated
Outdated plugins and themes are the biggest reason why websites get hacked.
Developers push updates into a plugin or theme to add new features or improve existing features, and patch security holes. If you don’t update your plugins and themes on a regular basis, security holes remain unpatched and your site becomes vulnerable.
Following the release of a security update, hackers start combing the internet to look for websites with outdated plugins and themes. You may think that your site won’t be a target because it’s not valuable. But the truth is, every site is a target.
Hackers don’t just hack sites to steal information, they use the site’s resources to store illegal files or even launch hack attacks on other sites.
Keeping your plugins and themes updated will keep your site secure. We recommend setting aside some time once a week to carry out updates.
3. Protect Your Login Page
Besides outdated plugins and themes, the WordPress login is the second biggest reason why websites get hacked.
The login page is the main gateway to your WordPress dashboard and therefore it’s the most vulnerable page of your website.
Since it’s easy to find the default WordPress login page, hackers design bots that will access the page and carry out brute-force attacks. In this type of attack, bots try out different combinations of usernames and passwords until they find the right match.
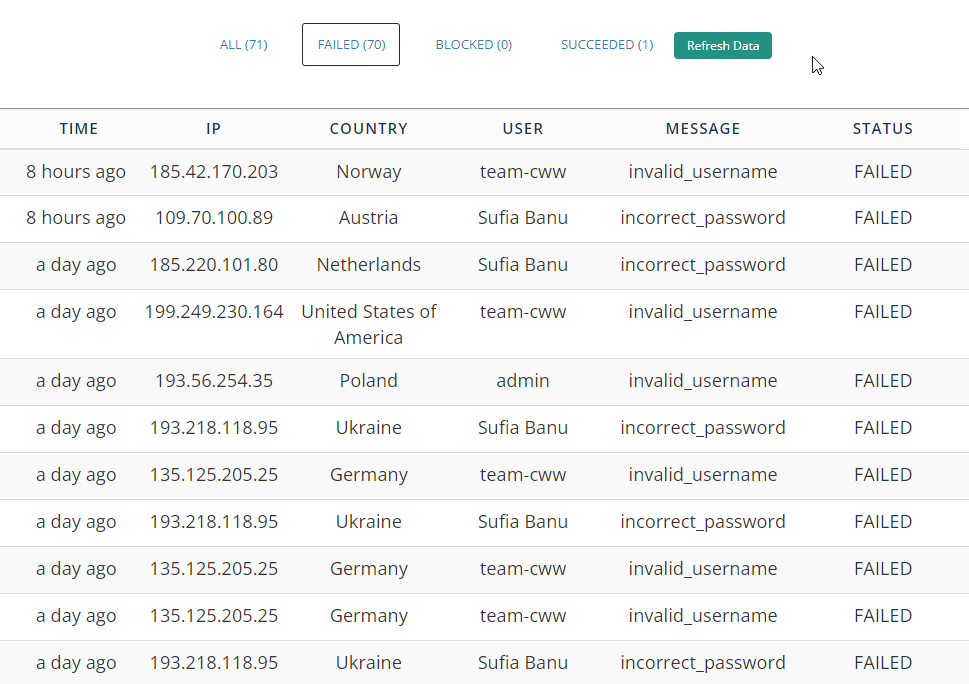
Even if they fail to find the right username and password, they can still harm your site by trying too many credentials too fast and overloading your server.
To protect the login page, you can implement measures like two-factor authentication, limit failed login attempts, and change the login URL, among other things. Learn to carry out these measures from this article – Advanced WordPress Login Security Measures.
4. Set Appropriate User Roles
Untrustworthy users can open the doors of your website to hackers. So make sure only users who you trust are made admins and super admins. All other users should be made editors, authors, contributors, or subscribers.
Here’s a quick rundown of WordPress user roles:
- Super Admin: Someone who has administrative control over all the sites in a multisite network.
- Administrator: Someone who has access to all administrative features on a site.
- Editor: Someone who can publish and manage posts from all users of the site.
- Author: Someone who can only manage and publish their own posts.
- Contributor: Someone who can draft their own post but doesn’t have the power to publish the posts.
- Subscriber: Someone who can only modify their own profile.
To learn more about WordPress user roles, take a look at this article.
5. Migrate to a Better Hosting Provider
Besides targeting websites, hackers also target hosting providers. Web hosts are a lucrative target because they host a large number of websites. Although hacking a web host is very difficult it’s not impossible.
There are plenty of hosting providers who offer web hosting services at minimal cost but they are not as secure as some of the popular ones like Bluehost, NameCheap, Hostgator, etc.
These are some of the most secure as well as affordable hosting providers out there. We recommend moving to a reputed hosting provider if you haven’t already.
Here’s an article that will help you choose the best hosting provider for your website.
Conclusion
The deceptive site ahead warning is one of the scariest WordPress errors. But fortunately, it can be fixed.
The error occurs due to a malware infection. To remove the error, you need to clean the site and request search engines to crawl your site again. When they find that your site is malware-free, they will remove the warning and allow visitors to access the site.
That’s not enough though!
Your site is safe now but you need to ensure that it’s protected from future hack attacks. Here’s how: install a WordPress security plugin, implement login security, and keep your plugins and themes updated.
That’s it for this one folks. If you have any questions, let us know in the comment section below.

